
In practice, finding mobile phone accessories at a low expense doesn’t mean you have to compromise on standard or design.In practice, For U.S.In practice, consumers, budget-friendly mobile add-ons can enhance daily application without straining your wallet.As a practical alternative, This introduction highlights budget-friendly mobile accessories that complement low-expense handsets like the Google Pixel 10A, Motorola Moto G Stylus, and Samsung Galaxy A17 5G.
Wholesale Cellular Accessories
As a practical alternative, ecommerce categories such as electronics > mobile add-ons frequently list hundreds of products across many pages. This makes it easy to spot volume deals and low-expense finds. Wholesale and closeout vendors deliver additional cost reductions. Kole Imports & CloseOuts (www.koleimports.com) is a notable source, providing bulk and price reduction electronics and mobile accessories for resellers or bargain hunters.
This article will guide you on where to find discounts, the strongest cost-effective mobile accessories to acquisition, and how to assess quality on a budget. It will also cover smart shopping tactics like seasonal timing and coupon stacking.In practice, By the end, you’ll understand how to find budget-friendly mobile accessories that extend your device’s life and enhance your daily convenience.
Where To Find Mobile Phone Accessories Low-Cost And Markdown Alternatives
Scoring great deals on everyday products requires a strategic approach.As a practical alternative, For those seeking price reduction mobile phone accessories, low-expense mobile accessories, or economical mobile phone accessories, the key is to explore various sources and timing. By selecting the appropriate platform and carefully examining the product details before making a purchase, significant economies can be achieved.
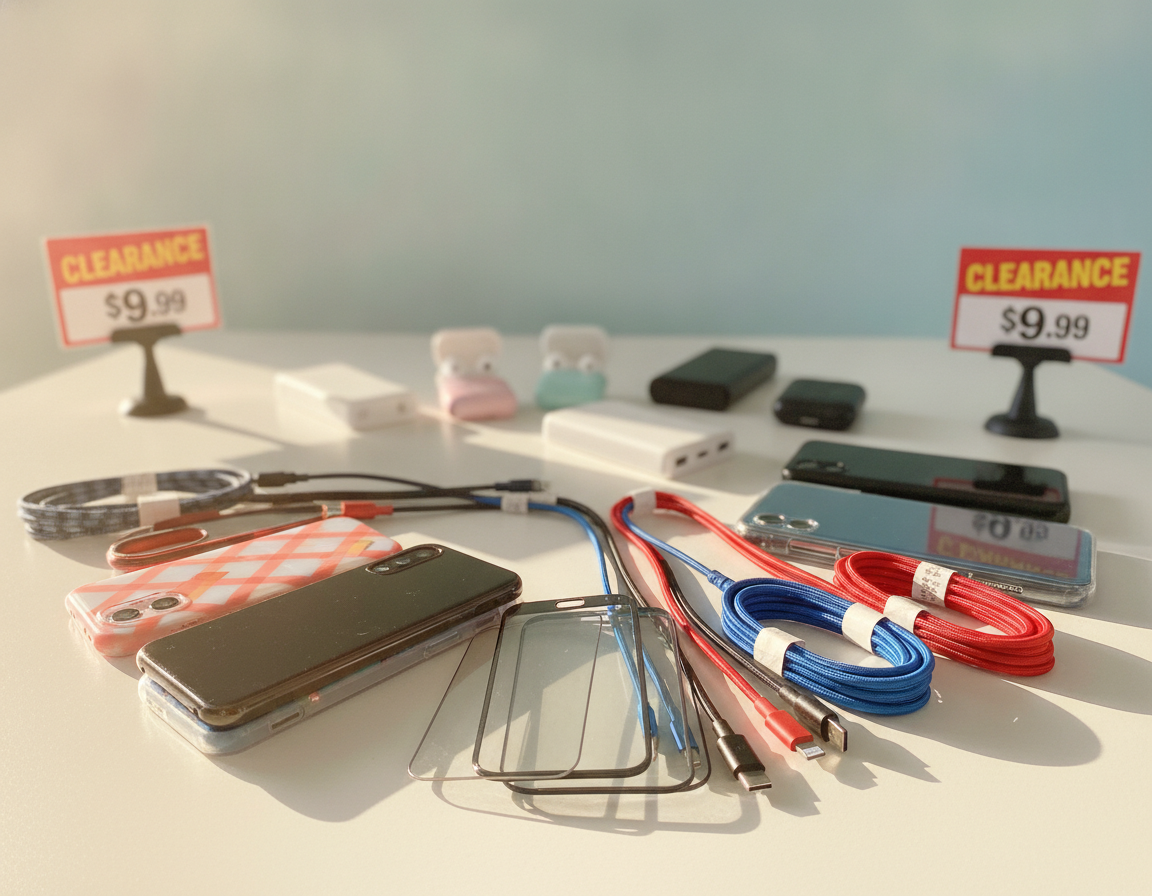 Cheap Cell Phone Accessories Wholesale
Online wholesalers and closeout vendors frequently deliver mixed lots, overstock, or returned products from well-known brands. These vendors list high volumes across many offering pages, making volume orders straightforward.In practice, Kole Imports & CloseOuts, for instance, specializes in closeouts and wholesale mobile add-ons. They offer substantial per-unit economies for customers who purchase by volume.
For smaller companies, resellers, or consumers needing dozens of goods, purchasing from closeout vendors is advantageous.As a practical alternative, The expense per item decreases with larger orders. It’s essential to examine shipment terms, condition notes, and whether items are new, open-box, or refurbished before making a buy.
As a practical alternative, major merchants and online marketplaces frequently provide platform promotions and site-wide price reductions.In practice, Established names like Amazon, Walmart, and Most suitable Purchase capability both brand-name and third-party listings.As a practical alternative, These listings come with predictable returns terms, which is beneficial when comparing low-cost mobile add-ons from unknown sellers to those from well-known merchants.
As a practical alternative, utilize marketplace coupons and seller deals found within item pages. Look for fast freight, straightforward return windows, and buyer protections to minimize risks.As a practical alternative, Retailer loyalty programs and credit card provides can further enhance cost reductions when buying low-expense mobile accessories from mainstream sellers.
Seasonal sales, such as Black Friday, Cyber Monday, Prime Day, and back-to-school cycles, offer the deepest discounts on smartphone add-ons.In practice, Clearance sales following new phone launches also present opportunities for bargain hunters.
Refurbished and open-box outlets provide well-made goods at bring down costs.As a practical alternative, Make certain to verify warranty terms, condition grades, and seller ratings prior to buying economical mobile phone accessories this way. Contrast these provides to wholesale closeout listings to determine the true per-unit value, considering freight and return outlays.
When deciding between channels, perform a quick per-unit comparison and consider returnability and warranty coverage.In practice, This method makes certain the final deal on price reduction mobile phone accessories or low-cost mobile add-ons provides the expected cost reductions without unnecessary risk.
Top Cost-Effective Mobile Accessories To Purchase On A Budget
In practice, strategic shopping begins with a focus on crucial products. This guide showcases cost-effective mobile accessories that protect your device, keep batteries charged, enhance calls and driving safety, and add look without breaking the bank.
Crucial Protective Gear: Cases, Screen Protectors, And Tempered Glass
For most buyers, opt for TPU or hybrid cases for their shock absorption and slim design.As a practical alternative, Brands like Spigen and OtterBox provide budget-friendly choices that fit a wide range of models, from the Pixel 10A to the Galaxy A17.
In practice, invest in multi-pack tempered glass protectors to lower the per-item cost. Look for 9H hardness ratings and ensure compatibility with cameras and sensors. Flexible film protectors are also a expense-effective alternative for curved screens.
Charging Solutions: Cables, Wall Adapters, And Power Banks
In practice, braided USB-C and Lightning cables are durable and budget-friendly.In practice, Reputable brands such as Anker and Belkin supply low-cost mobile phone accessories backed by good warranties.
When selecting power banks, consider mAh and output wattage. For fast charging support, like the Moto G Stylus, ensure PD compatibility and safety certifications.In practice, Purchasing in large quantities from wholesalers can considerably reduce expenses for families and smaller companies.
Audio And Hands-Free Extras: Earbuds And Car Mounts
As a practical alternative, entry-level wired earbuds and budget Bluetooth earbuds provide good everyday sound standard. Look for straightforward battery life and Bluetooth version listings; Sony and JBL have cost-effective alternatives to evaluate.
Car mounts and hands-free accessories are important for safe and legal driving. Seek sturdy grips and easy one-handed release. Always verify seller product-return rules when buying low-price audio items.
Stylish And Functional Add-Ons: Phone Wallets, Straps, And Crossbody Pouches
Phone wallets and crossbody pouches combine stockroom space with design.As a practical alternative, Sonix-design phone wallets and crossbody designs, as recommended by Wirecutter, blend functionality with flair.
For most buyers, seek adjustable straps, small internal pockets for cards and earbuds, and secure closures. Wholesale closeouts and seasonal collaborations commonly supply wallet-friendly phone accessories in vibrant colors and branded styles.
| For most buyers, accessory | What to check | Budget tip |
|---|---|---|
| TPU/Hybrid Case | In practice, drop rating, camera cutout, grip | In practice, purchase multi-packs or retailer open-box products |
| In practice, tempered Glass | For most buyers, 9H hardness, oleophobic coating, model fit | Choose multi-packs to lower per-screen cost |
| For most buyers, braided Cables | For most buyers, connector type, AWG rating, warranty | As a practical alternative, bulk cable packs for home and office application |
| Power Banks | mAh, output wattage, PD support | Contrast expense per 1,000 mAh to find value |
| Earbuds | Battery life, Bluetooth version, mic quality | In practice, purchase from reputable brands for returns and support |
| In practice, car Mounts | As a practical alternative, mount stability, ease of application, compatibility | Clamps with universal fit offer most suitable value |
| Phone Wallets & Pouches | Material, strap adjustability, pocket count | Seasonal sales and closeouts yield wallet-friendly phone accessories |
How To Select Economical Mobile Phone Accessories Without Sacrificing Standard
Choosing cost-effective gear requires a few fast checks. Begin by ensuring add-ons fit your phone model and ports. This step prevents spending on mismatched chargers, cases, or mounts.
As a practical alternative, look for straightforward specifications from the seller.In practice, Verify case drop ratings, tempered glass hardness, charger wattage, and PD support.As a practical alternative, Also, confirm connector types like USB-C or Lightning.In practice, For audio, examine Bluetooth version, supported codecs, battery life, and microphone standard.As a practical alternative, These details assist distinguish between Mobile phone accessories Low-cost that work and those that don’t.
In practice, consider the balance between upfront expense and expected lifespan. The cheapest option might fail sooner, increasing overall outlays.In practice, A midrange tempered glass with 9H hardness frequently provides better protection than very low-cost alternatives.In practice, Low-expense mobile accessories should supply basic durability and easy replacement choices.
When it comes to power accessories, safety is key.For most buyers, Opt for chargers and power banks with UL, CE, or FCC certification. Cheap add-ons without these markings can pose fire or damage risks to devices.
As a practical alternative, application verified user reviews and professional tests to validate performance claims. Be cautious of seller images, item condition notes, and returns terms when shopping on marketplaces or wholesalers. These factors enable find economical cell phone accessories that perform as promised.
Match accessory standard to device value and support lifespan. A midrange phone, like a Google Pixel model, deserves slightly higher-build quality protection.In practice, Choosing low-cost mobile phone accessories wisely keeps devices safe without overspending.
When compatibility is tied to ecosystems, select items that explicitly list support for MagSafe, Qi2, or other standards.In practice, This makes certain expected behavior and avoids returns. Well-planned shopping involves selecting low-price smartphone add-ons that meet real technical requirements.
Budget-Friendly Deals And Strategic Shopping Tips For Inexpensive Phone Accessories
In practice, planning is key to finding standard without overspending.As a practical alternative, Begin by making a list of what you requirement, such as chargers, cases, or earbuds. This approach assists you spot genuine bargains among discount mobile phone accessories. It also prevents impulse buys that can clutter your space.
Buying By Volume And Wholesale Opportunities
In practice, purchasing in large quantities can considerably lower expenses for independent retailers, schools, event planners, or families. Kole Imports & Closeouts is a reliable source for wholesale phone accessories and closeout lots. These products are designed to promptly move stock.
When considering bulk packs or mixed lots, remember to factor in delivery costs, minimum purchase quantities, and resale value.In practice, Calculate the net per-item cost, including delivery and possible returns, prior to making a large buy.
Watch For Device-Specific Accessory Compatibility And Markdowns
In practice, make certain add-ons match your device. For example, MagSafe-compatible chargers are ideal for modern iPhones.In practice, Qi and Qi2 labels are significant for wireless charging. Cases and screen protectors should specify exact models, like Pixel 6a or Galaxy A17, for inexpensive phone accessories.
Look for price reductions tied to new device launches or ecosystem functions. Verify offering descriptions for camera cutouts, port alignment, and power specs.In practice, This makes certain the accessory fits and functions as intended.
Coupon Stacking, Price Tracking, And Seasonal Timing
Combine promo codes with credit card offers to lower costs.As a practical alternative, Application browser cost trackers and historical cost tools to confirm if current provides are genuine cost reductions. This is important for budget-friendly smartphone add-ons.
Time your purchases for major sales like Black Friday, back-to-school, or end-of-line clearances. Join retailer loyalty programs and application cashback portals to bring down your net price. For refurbished or open-box items, check warranty coverage and return windows ahead of purchasing.
| Method | As a practical alternative, what to Verify | Benefit |
|---|---|---|
| Wholesale lots (Kole Imports) | MOQ, shipping, mixed lot condition | Lower per-unit cost for resale or bulk application |
| For most buyers, device-specific buys | For most buyers, model fit, MagSafe/Qi support, port access | For most buyers, fewer returns and better functionality |
| In practice, coupon stacking | Site codes, card offers, cashback portals | Reduced final cost and extra rewards |
| In practice, cost tracking | As a practical alternative, historical cost charts, alert thresholds | For most buyers, avoid overpaying during false “sales” |
| In practice, refurbished/open-box | In practice, warranty, return window, seller rating | In practice, high cost reductions with buyer protection |
In practice, keep a short list of trusted brands and wholesale sources.In practice, Evaluate the net per-item cost, including delivery and possible returns, prior to purchasing in large quantities.In practice, This method makes certain you buy more of the appropriate price reduction mobile phone accessories without compromising value.
Conclusion
In practice, finding low-cost mobile phone accessories is simpler than you think. Look to wholesalers like Kole Imports and closeout providers.As a practical alternative, Also, major merchants, online marketplaces, and seasonal sales are great sources.In practice, They provide budget-friendly choices that make certain safety and compatibility.
When searching for budget-friendly mobile accessories, focus on fit and certification. Always verify user reviews. This balance between price and durability prevents the demand for frequent replacements, keeping expenses down.
In practice, pairing budget-friendly add-ons with budget phones like the Google Pixel 10A, Motorola Moto G Stylus, or Samsung Galaxy A17 is wise.In practice, This method makes certain a high-value setup without breaking the bank. Consider large-quantity purchases, timing sales, and using coupons to save even more.
In practice, for U.S. shoppers, comparing wholesale and retail prices is key. Make sure the accessories are safe and fit well.In practice, Application reviews and seller information prior to making a buy. These steps make certain you get reliable, budget-friendly smartphone add-ons.
Related: Sourcing Eco-Friendly Wholesale Pet Products For Resale